 Mezil
Guida illustrata
Il tuo primo librogame in 10 minuti
Un librogame è una storia in cui il lettore sceglie: alla fine di ogni capitolo decide cosa fare e il libro lo porta al capitolo giusto. Qui vedi, schermata dopo schermata, come si scrive con lo Studio di Mezil. Come esempio costruiamo «Le avventure di Pinocchio».
Illustrated guide
Your first gamebook in 10 minutes
A gamebook is a story where the reader chooses: at the end of each chapter they decide what to do and the book takes them to the right chapter. Here you see, screen by screen, how to write one with the Mezil Studio. As an example we build “The adventures of Pinocchio”.
Le schermate mostrano l’interfaccia in italiano; i numeri nelle immagini rimandano alle spiegazioni sotto ciascuna.
The screenshots show the Italian interface; the numbers in the images match the explanations below each one.
Prima di cominciare: come è fatto
Ti serve un account gratuito, con l’email confermata e le condizioni d’uso accettate (la pagina Studio te lo ricorda). Poi ricorda questa catena:
Before you start: how it is built
You need a free account, with a confirmed email and the terms of use accepted (the Studio page reminds you). Then remember this chain:

Passo 1Step 1
Crea la serieCreate the series
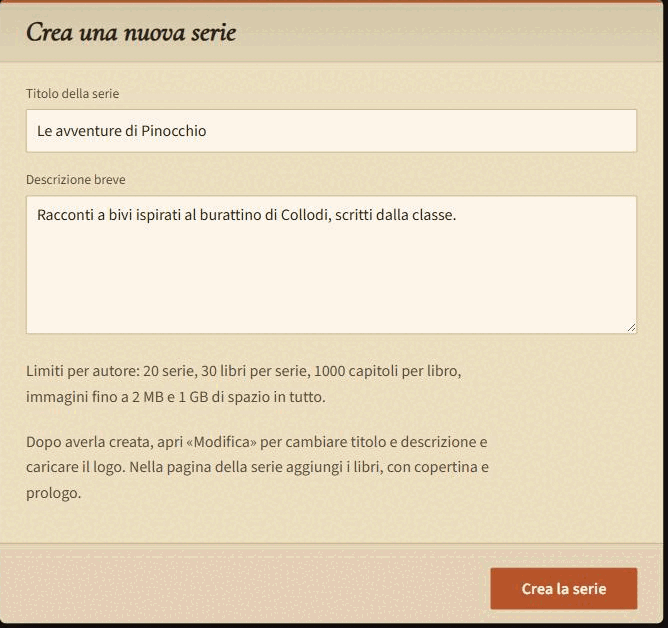
Apri lo Studio dal menu in alto. Nel riquadro Crea una nuova serie scrivi un titolo e una breve descrizione. Una serie è come una collana: conterrà i tuoi libri, e anche il personaggio con cui si gioca.
Open the Studio from the top menu. In the Create a new series box write a title and a short description. A series is like a collection: it will hold your books, and also the character the readers play with.
 123
- Il titolo della serie.The title of the series.
- Una descrizione breve: la leggeranno i lettori.A short description: readers will see it.
- Premi qui: la serie è creata e resta privata, la vedi solo tu.Press here: the series is created and stays private, only you can see it.
Sei un insegnante? Se lo hai indicato nel profilo, il titolo si compone da solo da tre pezzi: classe, materia e anno scolastico (per esempio 2B – Italiano 2026/27). Una serie per ogni classe, così le ritrovi anno dopo anno.
Are you a teacher? If you said so in your profile, the title is built from three parts: class, subject and school year (for example 2B – English 2026/27). One series per class, so you can find them again year after year.

Passo 2Step 2
Crea il personaggio (una volta sola)Create the character (just once)
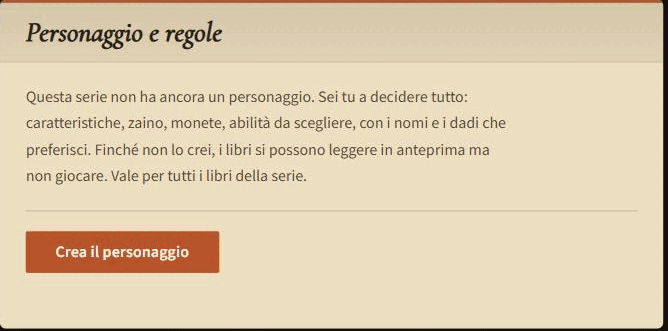
Dall’elenco delle serie premi Modifica. Nel riquadro Personaggio e regole premi Crea il personaggio. Il personaggio è la scheda con cui i lettori giocano: si crea una volta sola per tutta la serie e vale per tutti i suoi libri.
From the list of series press Edit. In the Character and rules box press Create the character. The character is the sheet your readers play with: you create it just once for the whole series and it applies to all its books.
 1
- Questo pulsante apre l’editor del personaggio.This button opens the character editor.
 123
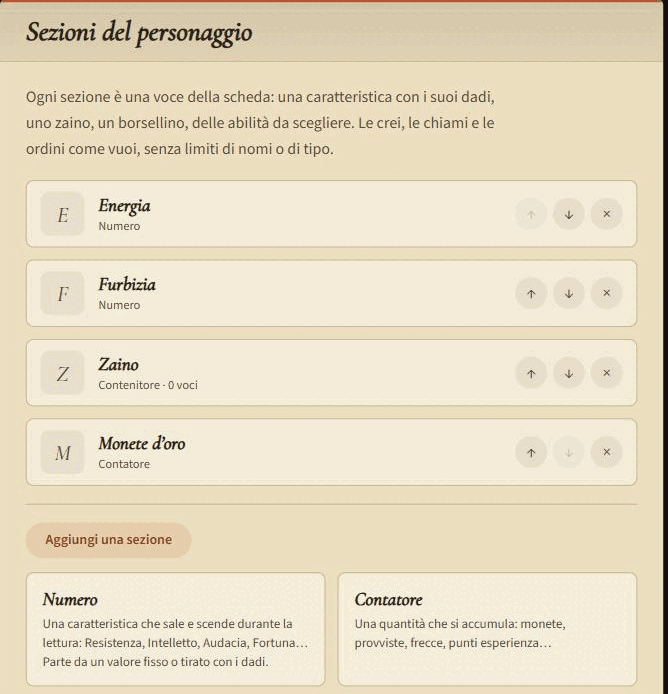
- Ogni sezione è una voce della scheda. Puoi spostarla, rinominarla o toglierla.Each section is one entry of the sheet. You can move it, rename it or remove it.
- Aggiungi una sezione…Add a section…
- …e scegli il tipo: Numero per le caratteristiche (Energia), Contatore per ciò che si accumula (monete), Contenitore per lo zaino, Scelta da una lista per abilità o armi.…and pick the type: Number for characteristics (Energy), Counter for things that pile up (coins), Container for the backpack, Choice from a list for skills or weapons.
Poi aggiungi le sezioni, cioè le voci della scheda. Per cominciare bastano due: Energia (un Numero, che scende quando il personaggio si fa male) e Zaino (un Contenitore). Le altre le aggiungi quando servono, anche dopo aver scritto i capitoli.
In fondo alla pagina ci sono anche i testi della pagina di creazione e della schermata di partenza: sono tutti facoltativi, e un’anteprima ti mostra come li vedrà il lettore.
Then add the sections, that is, the entries of the sheet. To start, two are enough: Energy (a Number, which goes down when the character gets hurt) and Backpack (a Container). You add the others when you need them, even after writing the chapters.
At the bottom of the page there are also the texts of the creation page and of the start screen: they are all optional, and a preview shows how the reader will see them.
Passo 3Step 3
Aggiungi il libroAdd the book
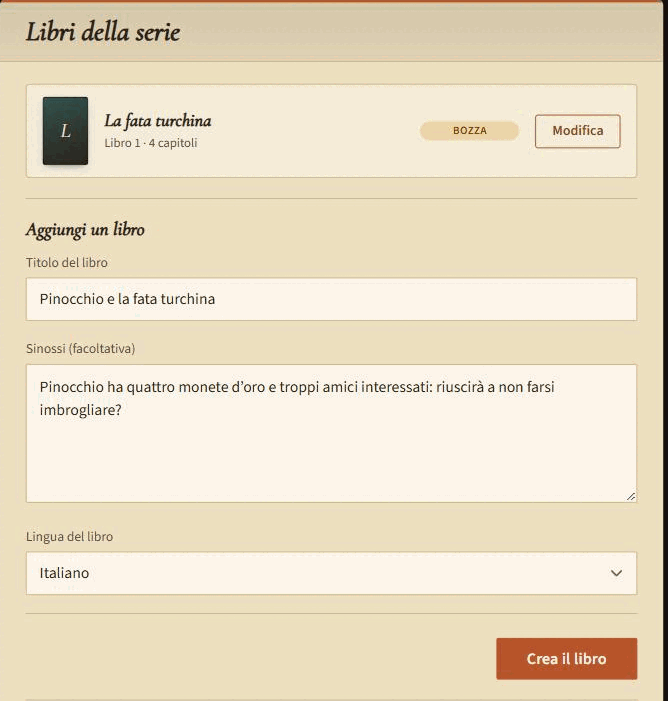
Sempre nella pagina della serie, più in basso, c’è Aggiungi un libro: titolo, una sinossi facoltativa e la lingua. Il libro nasce privato. Poi premi Modifica accanto al libro per aprirne la pagina.
Still on the series page, further down, there is Add a book: title, an optional synopsis and the language. The book is born private. Then press Edit next to the book to open its page.
 1234
- Il titolo del libro.The title of the book.
- La sinossi: poche righe che invogliano a leggere (facoltativa).The synopsis: a few lines that make people want to read (optional).
- La lingua in cui è scritto.The language it is written in.
- Crea il libro.Create the book.
Passo 4Step 4
Scrivi il primo capitoloWrite the first chapter
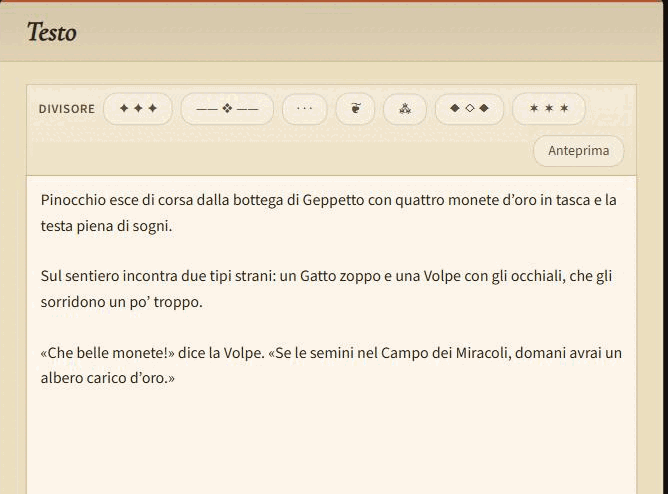
Nella pagina del libro, nel riquadro Capitoli, premi Apri i capitoli: aggiungi il capitolo 1 e aprilo con Modifica. Il testo si scrive nel riquadro Testo.
On the book page, in the Chapters box, press Open the chapters: add chapter 1 and open it with Edit. The text is written in the Text box.
 12
- I divisori: separatori decorativi, da mettere tra una scena e l’altra.The dividers: decorative separators to put between one scene and the next.
- Il testo del capitolo. Una riga vuota comincia un nuovo paragrafo.The text of the chapter. An empty line starts a new paragraph.
Scrivi poco: un capitolo di una decina di righe basta. Chi legge vuole scegliere presto.
Keep it short: ten lines or so are enough for a chapter. Readers want to choose soon.

Passo 5Step 5
Aggiungi le scelteAdd the choices
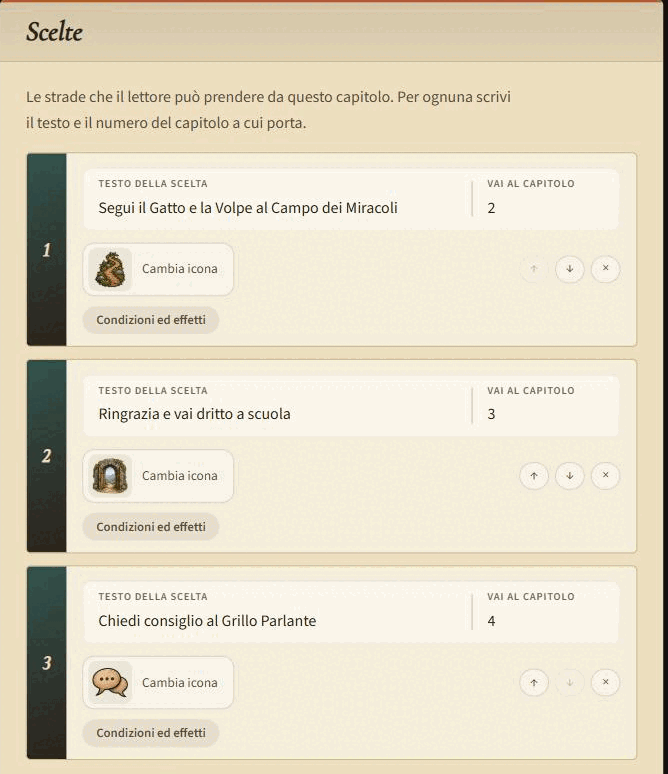
Subito sotto il testo, nel riquadro Scelte, scrivi che cosa può fare il lettore e a quale capitolo porta ogni scelta. È questo che fa di un racconto un librogame: da ogni capitolo si apre più di una strada.
Right below the text, in the Choices box, write what the reader can do and which chapter each choice leads to. This is what turns a story into a gamebook: more than one road opens from every chapter.
 1234
- Che cosa fa il lettore.What the reader does.
- A quale capitolo porta questa scelta.Which chapter this choice leads to.
- Un’icona (facoltativa) che accompagna la scelta.An icon (optional) that goes with the choice.
- Condizioni ed effetti: la scelta compare solo se il lettore ha un oggetto o un’abilità, oppure cambia dei valori.Conditions and effects: the choice appears only if the reader has an item or a skill, or it changes some values.
Il capitolo di destinazione può non esistere ancora: lo crei dopo. Il controllo del libro (passo 7) ti avvisa se ne manca qualcuno.
The destination chapter may not exist yet: you create it afterwards. The book check (step 7) tells you if any is missing.
Passo 6Step 6
Aggiungi dadi, oggetti e combattimentiAdd dice, items and fights
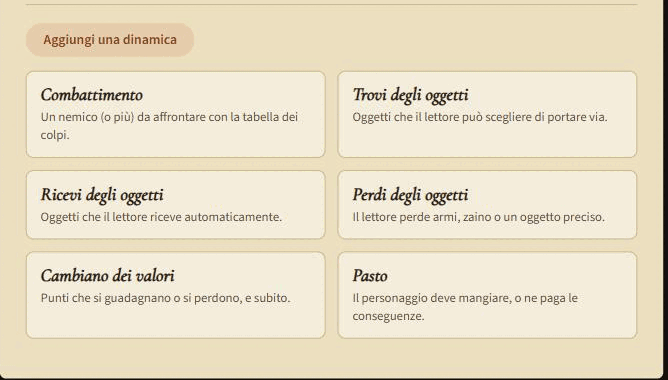
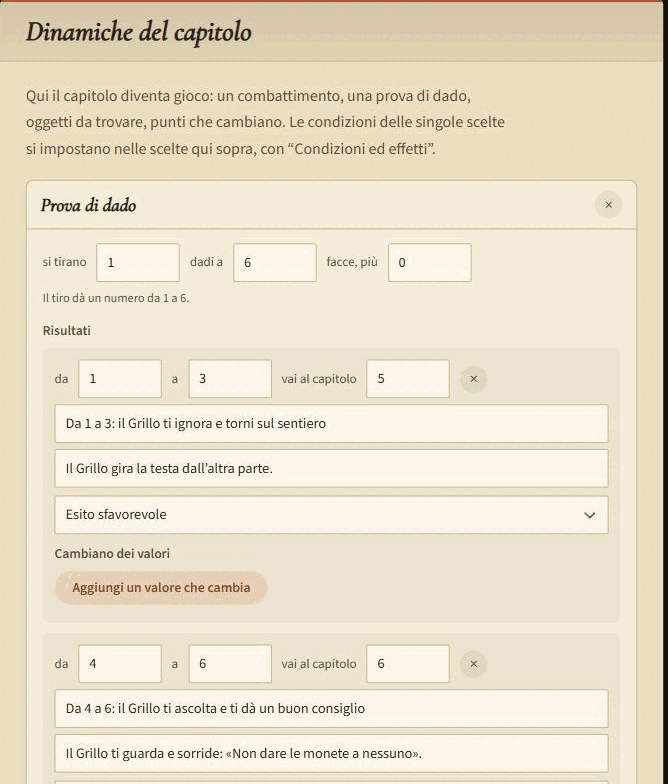
In fondo all’editor del capitolo c’è il riquadro Dinamiche del capitolo. Qui il capitolo diventa gioco: premi Aggiungi una dinamica e scegli che cosa deve succedere.
At the bottom of the chapter editor there is the Chapter dynamics box. This is where the chapter becomes a game: press Add a dynamic and choose what should happen.
 123
- Il dado da tirare: qui un dado a 6 facce.The die to roll: here one 6-sided die.
- Un risultato: da quale numero a quale, e a quale capitolo porta.One result: from which number to which, and which chapter it leads to.
- Il testo che il lettore leggerà dopo il tiro.The text the reader will read after the roll.
Passo 7Step 7
Controlla e prova il libroCheck and try the book
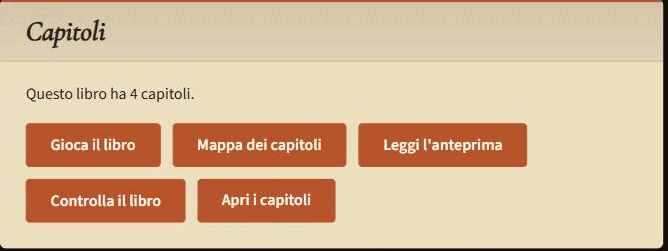
Torna alla pagina del libro. Nel riquadro Capitoli trovi gli strumenti per verificare il lavoro, prima di farlo leggere a qualcuno.
Go back to the book page. In the Chapters box you find the tools to check your work before anyone reads it.
 1234
- L’elenco dei capitoli: qui li crei e li scrivi.The list of chapters: this is where you create and write them.
- La mappa: tutti i capitoli come un disegno di frecce.The map: all chapters drawn as a web of arrows.
- L’anteprima: leggi il libro come lo vedrà il lettore, senza salvare nulla.The preview: read the book as the reader will see it, without saving anything.
- Il controllo: trova i collegamenti spezzati, i capitoli irraggiungibili e i vicoli ciechi.The check: finds broken links, unreachable chapters and dead ends.
Gioca il libro compare quando la serie ha il personaggio: lo provi con dadi e punteggi veri, come un lettore.
Play the book appears once the series has its character: you try it with real dice and scores, like a reader.

Passo 8Step 8
Chiedi la pubblicazioneRequest publication
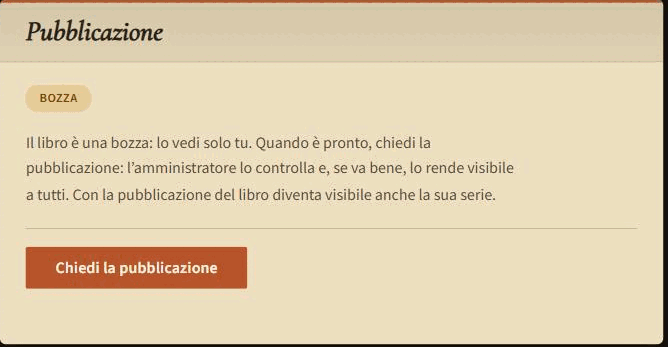
Quando il libro è pronto, nel riquadro Pubblicazione premi Chiedi la pubblicazione. Finché non lo fai il libro resta una bozza che vedi solo tu.
When the book is ready, in the Publication box press Request publication. Until you do, the book stays a draft that only you can see.
 1
- Chiedi la pubblicazione: l’amministratore controlla il libro e, se va bene, lo rende visibile a tutti.Request publication: the administrator checks the book and, if all is well, makes it visible to everyone.
Per la classe
Con una classe si può scrivere tutti insieme sullo schermo dell’aula: i ragazzi propongono, l’insegnante scrive. Qualche idea:
- Una serie per classe, con un nome uniforme (classe, materia, anno): la ritrovi l’anno dopo e aggiungi un nuovo libro.
- Prima su carta: stampa la scheda di progetto, disegnate insieme la mappa dei capitoli e decidete i bivi, poi scrivete nello Studio.
- A gruppi: ogni gruppo scrive un capitolo, e il bivio finale lo decide la classe.
- Ruoli: chi inventa il personaggio, chi disegna la mappa, chi scrive i dialoghi, chi controlla che tutti i bivi portino da qualche parte.
For the classroom
A class can write together on the classroom screen: the students suggest, the teacher types. A few ideas:
- One series per class, with a uniform name (class, subject, year): you find it again next year and add a new book.
- On paper first: print the project sheet, draw the chapter map together and decide the forks, then write in the Studio.
- In groups: each group writes one chapter, and the final fork is decided by the class.
- Roles: who invents the character, who draws the map, who writes the dialogues, who checks that every fork leads somewhere.
Pronto?
Apri lo Studio e crea la tua prima serie. Se qualcosa non è chiaro, scrivici dalla pagina Contatti: la guida si migliora con le tue domande.
Ready?
Open the Studio and create your first series. If something is not clear, write to us from the Contact page: the guide gets better with your questions.